
As an added service to our faculty, Nipissing University makes available Word-Press and other services for self-serve faculty websites. Please contact marketing@nipissingu.ca for further information.
Minor Update to the NU Branding Plugin
This week sees a minor update to the NU Branding Plugin. It is now ‘responsive’. Responsive, in terms of website design, means it will adapt it’s layout to the size of the device viewing it, making it much more friendly to tablets and mobile devices viewing it.
A New Plugin and an Update
A couple new releases this week…
- The NU Branding Plugin has been updated to offer a few new features. New features include the ability to toggle on/off what Nipissing links you would like to display, as well as the ability to add one or two custom links of your own, in either column of links.
- A new plugin is available this week. The new plugin, Verdon’s NU Meta Links, has been network activated and is available immediately. This plugin creates a new widget that is available to all in your Widgets area. The new widget looks much like the standard WordPress Meta widget, which provides Login and RSS links and such in any widget area, except that you can toggle individual links on or off to suit your needs, as well as add a custom link if required.
Please enjoy, and let me know should you need anything for your site.
NU Branding Plugin Available
There’s a new plugin available for all users called “Verdon’s NU Branding”. This plugin will add a little Nipissing University branding to any theme. In this first version, it just adds a footer to any other theme, that can be customized to show a couple different Nipissing logos and contact information. It can be configured in several ways. Future versions will offer more.
Please note, this may not play nicely with all themes, though it can readily be deactivated if it is not working with yours. If you’ve tried it and would like to make a feature request, please contact me.


Visual Editor Enhancements
In response to a few requests, we’ve made some tweaks to the visual editor for posts and pages. The initial request was for an easy way to do paragraphs with a hanging indent, as used in citations and such. This is a common need for our users, and there was really no user-friendly way to achieve that. So, we have replaced the ‘Styles’ menu from the 2nd row of the toolbar with a more robust ‘Formats’ menu. This provides a place for our custom format, and a platform to go forward with, should we need future custom options.
Using the new ‘Hanging Indent’ format is as easy as 1,2,3.
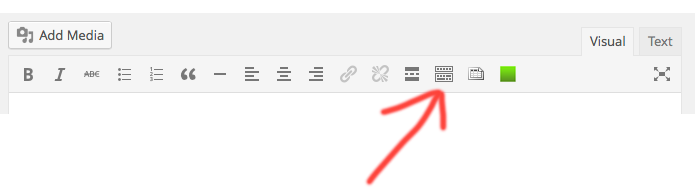
1) If you do not already see the 2nd row of buttons in your editor, click this button to toggle it.
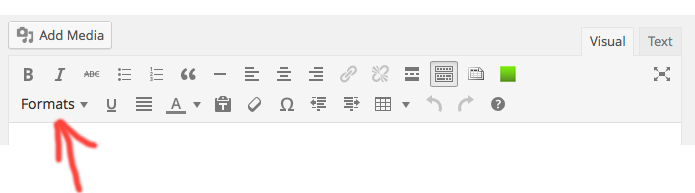
2) Now look/click in the ‘Formats’ menu.
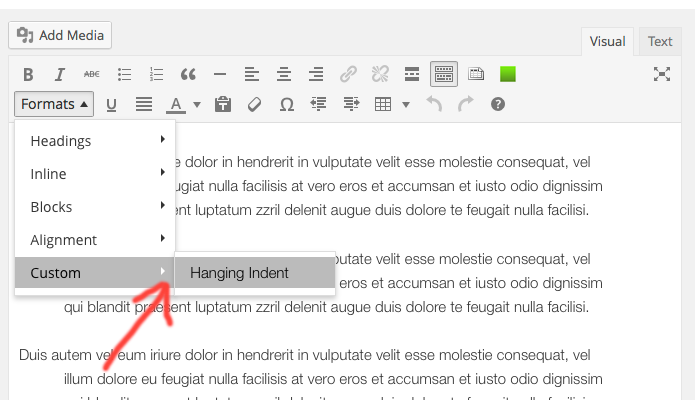
3) With your cursor anywhere within the paragraph(s) you want to have a hanging indent, select ‘Hanging Indent’ from the ‘Custom’ sub-menu.
Please let us know if you have any special needs in your WordPress site.
Getting More From Your Editor
Did you know that there are a lot more tools in your editor, than just bold, italic, strike-through, and a couple lists? If you’ve been wondering where these tools are, or what those two funny looking buttons to the right of your toolbar are for, read on.
Distraction Free Writing mode
![]() Find the editor a little small? Too many distractions on your screen? Try clicking on this little icon. Your editor window will expand, giving you a large workspace.
Find the editor a little small? Too many distractions on your screen? Try clicking on this little icon. Your editor window will expand, giving you a large workspace.
The Kitchen Sink
![]() Wondering where the rest of the editor tools are? Click on the kitchen sink icon to expand your toolbar to it’s full glory. You will now have other formatting options, undo/redo tools, copy/paste options and more. Try your favourite keyboard short-cuts too. You’ll find that many of them work the same as you are used to.
Wondering where the rest of the editor tools are? Click on the kitchen sink icon to expand your toolbar to it’s full glory. You will now have other formatting options, undo/redo tools, copy/paste options and more. Try your favourite keyboard short-cuts too. You’ll find that many of them work the same as you are used to.

Styles and Formatting
![]() Want to simplify your formatting? Try the styles menu. Just as in any word processor or publishing program, using styles can greatly reduce the time taken to keep text formatted, and maintain consistency throughout your site.
Want to simplify your formatting? Try the styles menu. Just as in any word processor or publishing program, using styles can greatly reduce the time taken to keep text formatted, and maintain consistency throughout your site.
Raw HTML
![]() Still need a few more options than what the toolbar provides? Are you a little geeky and like to tweak things? Wondering what happens when you click on these buttons? Go ahead, give it a look…. The ‘Visual’ (default) mode for the editor is a WYSIWYG (what you see is what you get) editor, much like a wordprocessor. The ‘Text’ mode is more-so a raw html mode. It does not display paragraph tags, but other than that shows you the html source code that builds your content, allowing you to tweak this. It also accepts direct entry of much html that is not in your editor toolbar, for more advanced users.
Still need a few more options than what the toolbar provides? Are you a little geeky and like to tweak things? Wondering what happens when you click on these buttons? Go ahead, give it a look…. The ‘Visual’ (default) mode for the editor is a WYSIWYG (what you see is what you get) editor, much like a wordprocessor. The ‘Text’ mode is more-so a raw html mode. It does not display paragraph tags, but other than that shows you the html source code that builds your content, allowing you to tweak this. It also accepts direct entry of much html that is not in your editor toolbar, for more advanced users.
Have fun exploring your editor. It’s more powerful than you may have realized!
Static Front Pages
The following is taken from the official Word-Press guide at http://codex.wordpress.org/Creating_a_Static_Front_Page
Creating a virtual static front page does not require editing or coding of files or templates. Using the default configuration for a “static front page” in WordPress does not remove the sidebar or change the look of the entire site, just the content area.
To create the static front page, go to the WordPress Administration Panels.
- Create two WordPress Pages from the “Add New Page” panel. If you will not be using WordPress blogging functionality, you can skip the second page.
- Title the first page “Home” (or another name) as your “static” front page.
- Set the “Home” template to the default template or any custom template. Do not title your template home.php as this could cause a conflict.
- Add content you would like to see within the content area of the “Home” page.
- Publish the Page.
- Title the second page “Blog” (or you could call it “News”, “Articles”, etc.). This page will be a place-holder for showing the Posts on your site.
- Do not use a custom Page template for this page! home.php or index.php will be used to generate this page.
- DO NOT add content to the Blog Page. Leave it blank. Any content here will be ignored — only the Title is used.
- Publish the Page.
- Title the first page “Home” (or another name) as your “static” front page.
- Go to Administration > Settings > Reading panel.
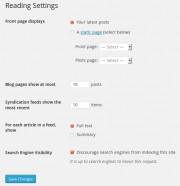

Reading panel
- Set ‘Front page displays:’ to ‘a static page’ and choose the first page you created above for ‘Front page.’ If your WordPress site will contain a blog section, set ‘Posts page’ to the page you created for this above. Otherwise, leave this blank.
- Save changes.
- Enable “Permalinks“ to show the “page title” in the address, since
/index.php?p=423defeats the purpose of making a static front page.

While we are calling this a “static front page,” you can change the content on that web page at any time by editing the Page.
Word-Press Quick-start Guide
Logging in
After you request your Nipissing University WP (WordPress) Site, you will receive an email with the site URL that others will use to view your site. That URL will be in the following format: https://faculty.nipissingu.ca/yoursitename
The email will also include your username, password and a login URL in this format: https://faculty.nipissingu.ca/yoursitename/wp-login.php. You may want to bookmark your admin login link for future reference.
Choosing this link will allow you to enter your username and password and move directly to the WordPress Dashboard. When you are logged in, the WordPress admin toolbar will be across the top of the page.
![]()
The admin toolbar will give you access to a number of tools, including WordPress’s own support documents and forums, all of the sites you are associated with, and the ‘public view’ of what your site looks like to other people. It also provides shortcuts to comments on your site, and the ability to make posts. You can log out of WordPress by clicking on your username at the right. Once you log out, you will need to sign in again to make any edits or changes to your blog.
If this is the first time you have logged into WP, the site will know this and present you with a welcome message on the Dashboard. It is recommended that you take a moment to read and explore some of this information. In particular, they have provided you with resources for how to adjust your basic settings, add real content and customize your site.
Dashboard
Think of the Dashboard as the control panel for your entire WordPress site. The vertical menu at left provides you with all of the access to the tools you need to create and manage your site. The information below will provide a brief outline of the purpose and function of the most frequently used tools to begin using WordPress.
Posts
![]()
Most of the content you upload to your site will begin here with the Posts function. Selecting ‘Post’ and then ‘Add New’ will create a new entry to your blog. New entries will always appear on your home page, which populates in reverse chronological order with your most recent post at the top.
After you have created a post, click ‘Publish’ to add it to your blog. You can see how your new entry looks on your site by clicking the ‘Preview’, or ‘View Post’ button. You are always able to edit a post from the Dashboard by selecting ‘Posts’ and then hovering over the entry and choosing edit.
Tags and categories
 Word-Press allows you to attach tags and categories to posts. Tags and Categories serve similar functions but are slightly different. Grouping your posts into categories will allow you to display them as a menu on your site. Alternatively, Tags can be used to mark or label posts with a specific word so it’s easier to search for them on your site. To add a Tag or a Category to your site, you can go to ‘Posts’ in your Dashboard and choose either ‘Categories’ or ‘Tags’. You can also input these details while you are creating a post, before you select ‘Publish’
Pages
An alternative way to add content to your site is to use the Pages tool. The difference between pages and posts is that pages will appear in the navigation bar of your site and they are intended for more static content, rather than a continuous thread of posts. Therefore, as an example, the pages tool is well suited for an About Me page.
WordPress automatically creates a page called ‘Sample Page’ to give uses an example of what a page looks like. Select ‘Pages’ in the left menu and hover over a page to reveal editing, preview and delete functions. Choose ‘Add new’ to create a new page on your site.
Media
You can add images, video, audio, and documents to a post or page. The simplest way to do this is while you are creating an entry. Above the textbox in the new post tool is an ‘Upload/Insert’ icon. Choose this to open the drag-and-drop interface. Drag your image, document, video or audio file into that box, or choose ‘Select Files’ to find the file on your computer for uploading. The interface will detect the type of media you are uploading and present you with various options to customize how the media is made available on your site.

Choose ‘Insert into Post’ to add the media and continue with your post.
The maximum file upload size is 10 MB. If you are attempting to upload a large video, you may want to consider storing it on a video sharing service such as YouTube, and simply providing the link in your entry. WordPress will do the rest.
Appearance

By default, your Nipissing University WP site employs a theme called ‘Twenty Eleven’. Themes control the look and feel of your site. By choosing ‘Appearance’ in the left menu, you have the ability to choose a different theme for your site to suit your preference. You can click on a theme to see a preview of how that design will look with your content. Once you have selected a theme, click on the Activate link on the top of the preview window to apply the theme. Please note that if you have configured custom menus or widgets, you will have to re-add them after changing your theme.
Comments

By default, Blog posts that you have made are open to comments from the public. This feature adds an interactive element to your WP site. Users should be aware however that in order for a reply to appear on your site, you are required to accept it. You are considered the moderator of the site and have the authority to accept or reject comments as you see fit. You may also disable commenting altogether on new posts.
WP will send you an email when a comment is posted, and from that email you can choose to accept or reject the comment. Alternatively, if there are many comments awaiting moderation, the quickest way to manage these interactions is to choose the ‘Comments’ button from the dashboard.
Here, you will see every comment awaiting moderation. Hovering over each comment will reveal options to approve, reply, edit or trash the comment. You may also use the checkboxes to perform a ‘bulk action’ to every comment.
It’s also worthwhile to note that you can change the settings that pertain to these comments by choosing from the dashboard ‘Settings’ and then ‘Discussion’. For example, by default, users are required to include their email address with each comment. As well, WP will email you when every comment is posted. These are settings that can be changed from the discussions pane.
Logging out
 To log out of your Word-Press site, go to the top left of your screen and click on your username. In the drop down, you will see a menu option for you to log out. Once you log out, you will need to sign in again to make any edits or changes to your blog.
Additional help
This WP site will be used to post support, resources and news about Nipissing University WP sites. Watch for additional posts here.
Another great source of information is the official Word-Press wiki and documentation here: http://codex.wordpress.org/WordPress_Quick_Start_Guide
Nipissing U Theme
A Nipissing U theme is now in beta and available to you to try. There may still be some changes to come with it, but the core of it is in place. It is a child-theme to twentyeleven, so all the features of that theme are available to you, with a little Nipissing branding. Feel free to use for your site/blog.